Campervan electrical guide: 12V leisure systems for UK vans
3 June 2026Electrics & Leisure
The UK Van Electrical Guide: 12V Leisure Systems Without the Red Wine Diagram
(you can understand this properly in one sitting — I promised)
There's a particular moment in every van build where the romance dies. For me it arrived at about half ten on a Tuesday night, sitting in the back of a stripped-out Transporter with a leisure battery in my lap, a roll of cable I'd bought on a guess, and a YouTube video paused on a wiring diagram that looked less like an electrical schematic and more like the London Underground map after someone had spilled red wine on it. I had assumed — genuinely, sincerely assumed — that you put a battery in the back, attached some lights, and got on with your life. I had not assumed I'd be reading a forum thread at midnight about whether my alternator was "smart" and what that meant for my marriage.
The problem isn't that 12V electrics are hard. The problem is that everyone explaining them to you is either American, selling you something, or so terrified of being wrong that they never tell you anything at all. You read three guides and come away knowing less than when you started, plus a vague sense that you need to spend £4,000 on Victron kit or you'll burn the van down.
So here's the thing nobody says plainly: you can understand this properly in one sitting. Let me walk you through it.
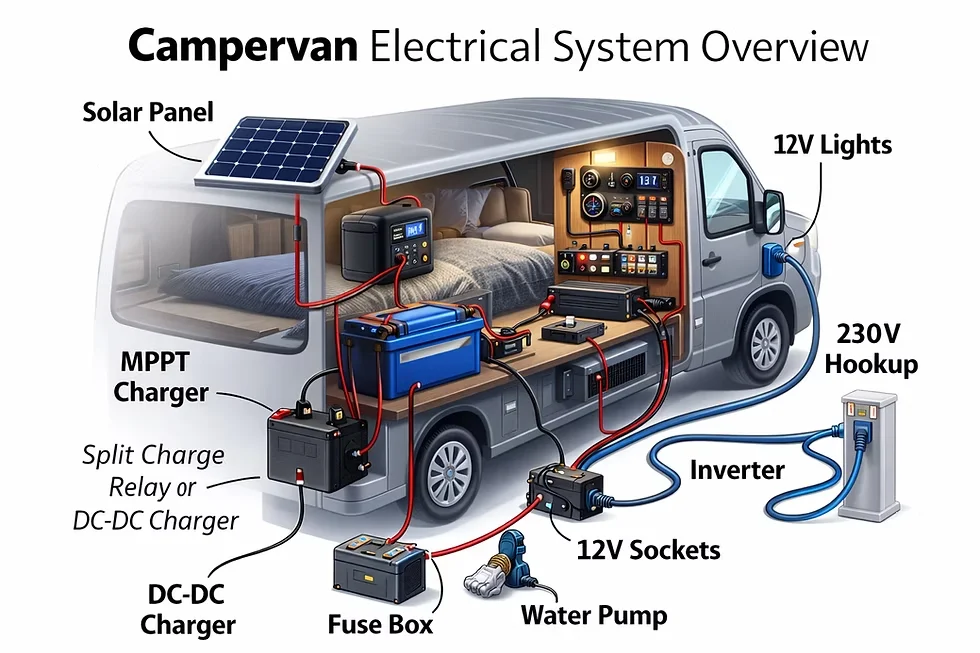
How a leisure electrical system actually works
You have two batteries doing two completely different jobs, and keeping them separate is the whole point.

Your starter battery exists to crank the engine. It delivers a huge burst of current for half a second and then sits there being topped up by the alternator. That's its entire personality. If you run your fridge and lights off it overnight, you'll flatten it, and a flat starter battery on a Sunday morning in a field is a genuinely miserable way to discover how electricity works.
Your leisure battery is the one that runs your living space — lights, fridge, charging, the lot. It's designed to be drained slowly and deeply, then recharged, over and over. It lives a different life and it needs to be electrically separate from the starter so that no amount of evening Netflix can leave you stranded.
The leisure side is simple in shape: the battery feeds a fuse box, and the fuse box feeds your loads — fridge, lights, USB sockets, water pump. That's the consuming half.
The other half is charging. The battery gets topped up from one or more sources: the alternator while you drive, solar on the roof, and mains hook-up when you're on a campsite. The battery sits in the middle as a buffer — it banks energy when supply is high (sunny afternoon, long motorway run) and hands it back when demand outstrips supply (3am, fridge humming, no sun).
That's it. That's the mental model. Everything else in this guide is just two questions: how big should the battery be, and how do you keep it charged? Forget Ohm's law. You don't need it.
How much power do you actually need
This is where most guides hand you a calculator and wander off. Let's actually do it, with honest UK numbers.
Here are the real daily loads in a typical British van:
- Fridge (12V compressor): the big one. Around 30–50Wh/day in a cool British summer, climbing to 50–80Wh in winter when it's working harder against the cold cabinet — and yes, fridges work harder in a cold van too, because the compressor still cycles.
- Lighting (LED throughout): 5–15Wh/day. Trivial. Genuinely don't worry about your lights.
- Phone and laptop charging: 20–50Wh/day depending on how much you pretend you're going to "work from the van."
- Diesel air heater: a 10–20Wh spike on startup as the glow plug fires, then just 8–12W running the controller and fan. Low, but it's on all night.
- Water pump: negligible. It runs for seconds at a time.
- Induction hob: a different conversation entirely. This only works with a large inverter and a serious lithium bank — flag it now and budget for it separately, because it'll define your whole system.
Now the part that matters: usable capacity, not headline Ah.
An AGM battery gives you about 50% usable — drop below half charge regularly and you'll cook it. So a 100Ah AGM is really a 50Ah battery that happens to weigh 28kg. Lithium gives you 80–90% usable, so a 100Ah lithium is genuinely 80–90Ah of working capacity. This is why lithium feels like a far bigger upgrade than the matching Ah figure suggests — you're not comparing like for like.
Three honest worked examples:
- Weekend warrior (Fri–Mon, mostly campsites): 80–100Ah usable is plenty. Do not let anyone sell you a 300Ah bank for this. You will never use it and it'll sit there depreciating.
- Seasonal user (2–3 weeks at a time, mix of hook-up and wild camping): 150–200Ah usable.
- Full-timer, year-round off-grid: 300Ah+ usable — and the honest bit: accept that a UK winter means hook-up more often than your off-grid fantasies allow.
One more rule, and it's the most UK-specific thing here: build for 4–5 days of autonomy, not 2–3. Britain can serve you a run of flat grey overcast in literally any month of the year. A system designed around two days of no solar will have you sheepishly hunting for a campsite hook-up by Thursday lunchtime, telling yourself it's "for the shower."
Battery technology: AGM vs lithium
The chemistry is explained everywhere, so I'll skip it. The decision is what matters.
AGM is cheap to buy — a 100Ah unit runs £80–£150. It's also heavy (~28kg), gives you only 50% usable capacity, and lasts maybe 300–500 cycles to 80% capacity at that 50% depth of discharge. Fine for occasional weekends. Poor value for anything you do regularly.
Lithium (LiFePO4) costs more upfront — £250–£600 for 100Ah depending on brand — but weighs about 12kg, gives 80–90% usable, and survives 2,000–4,000 cycles. That's a battery that will very likely outlast the van. Over five years, once you've replaced your second set of AGMs, lithium usually works out cheaper, and the weight saving alone — 16kg per battery — is worth real money in a van where payload is precious.
The cold-weather question — and this is genuinely UK-specific. Most lithium batteries refuse to charge below about 0°C; charging frozen cells damages them, so the BMS blocks it. From October to March, overnight temps in an uninsulated van regularly sit at 2–5°C and occasionally dip below zero. What this means in practice:
- Don't expect solar or alternator to charge a near-freezing battery — a decent BMS will simply refuse, and that's it protecting itself, not a fault.
- Choose a battery with a built-in low-temperature cutoff so this is handled automatically. Fogstar Drift, EcoTree and Skyenergi units all have this.
- The hidden risk with bargain-basement lithium from unknown brands isn't the capacity rating being optimistic — it's the missing low-temp protection. That's what kills cells in a British winter.
A note on suppliers, because every other guide points you at Renogy. Renogy has no real UK stock or UK warranty support — it's effectively an import, and "import" is not a word you want attached to a warranty claim. UK-stocked options with actual support: Fogstar (Bridgend, Wales), Skyenergi, EcoTree Lithium, and 12 Volt Planet. Victron doesn't make batteries at all, but its ecosystem plays nicely with all of them.
Verdict: AGM only makes sense if you're doing occasional weekends and the upfront cost genuinely stings. For anything more regular, lithium pays for itself and saves you carrying a sack of cement around. For the full job, see [the CFA article on replacing an AGM with lithium].
Charging sources: alternator, solar, and hook-up
Three sources, working together. Understanding each stops you pouring money into one while neglecting another.
Alternator charging — and the smart alternator trap. Every van has an alternator, and the instinct is to connect the leisure battery to it via a cheap split-charge relay. Simple, works, done.
Except vans from roughly 2015 onward increasingly have smart alternators (also called variable-voltage alternators). These don't hold a steady 14.4V — they deliberately vary output to claw back braking energy and ease load under acceleration. A split-charge relay on a smart alternator often barely charges the leisure battery, because the voltage never climbs high enough to trip it.
How to check: engine running, multimeter on the starter battery, give it a rev. If the voltage swings about noticeably — say 13.2V up to 14.8V and back — you've got a smart alternator.
If you have one (or you're running lithium), you need a DC-DC charger, also called a B2B (battery-to-battery). It takes whatever the alternator throws out and steps it up to charge the leisure bank properly. The Victron Orion-Tr Smart (£130–£200) is the standard; Sterling Power make a solid UK alternative. For the fitting walkthrough, see [the CFA article on fitting a Victron Orion B2B charger].
Is it worth driving for? A B2B at 20A puts roughly 100Ah into the bank over five hours. A weekend warrior driving 2–3 hours each way picks up maybe 60–80Ah a trip — useful, but solar and hook-up do the rest. A full-timer driving daily turns the alternator into their primary source.
Solar — the uncomfortable UK truth. Solar is brilliant in summer and largely decorative in winter. A 200W panel on a south-facing roof produces roughly:
- June–August: 800–1,000Wh on a clear day.
- October–March: 150–300Wh on average, and less when it's properly grey.
- January in the Highlands: sometimes next to nothing for days at a time.
So in summer, 200W comfortably keeps a 150Ah bank topped for a weekender. In winter, the same array barely covers the fridge. A reasonable rule of thumb is 100W of panel per 100Ah of lithium for summer use — go bigger if the roof allows, because panels are cheap (~£80–£100 for 100W) and roof space, not budget, is the real limit. Always use an MPPT controller over PWM; the premium is small and the extra harvest is real.
Shore power / electric hook-up (EHU). Most UK pitches offer 16A mains (230V) via a blue CEE socket. A hook-up lead plugs into an inlet on the van, feeds a 240V circuit inside, and charges the leisure bank through a mains charger.
For year-round use, hook-up is the backbone of your winter strategy, not an embarrassing fallback. A good mains charger — a Victron Blue Smart IP22, or the charger built into a MultiPlus — bulk-charges the bank overnight, and you wake to a full battery regardless of what the sun didn't do. Winter camping in the UK is, for most people, hook-up camping. There is nothing wrong with admitting that. See [the CFA article on fitting an EHU shore power inlet].
The whole picture: alternator for driving days, solar for clear summer days off-grid, hook-up for everything else. Most UK builds only need two of the three working well.
The Victron question
Victron Energy occupies the premium end of this market, it's in every build guide going, and the prices make your eyes water: a MultiPlus inverter/charger is £400–£800, a Cerbo GX monitoring hub £250, a BMV-712 monitor £130. A full Victron system can add £1,500–£2,000 to a build on its own.
Worth it? Honest answer:
Buy Victron if you're full-timing or doing serious multi-week trips; you're juggling several charging sources that need to coordinate; you want everything talking to each other over Bluetooth through the VictronConnect app; and you'd rather pay once than troubleshoot for a decade. The integration between their solar controller, B2B, inverter and monitor is genuinely excellent and replaces what would otherwise be a drawer of mismatched displays.
Don't buy Victron if you're a weekend warrior with a basic setup. That said — a Victron SmartShunt (£55) and a SmartSolar MPPT (£80–£120) are superb value and worth buying even on a tight budget. It's the MultiPlus and Cerbo GX where the cost runs away, and for a 100Ah-plus-solar system they're firmly overkill.
The mixed approach is the one most guides are too brand-aligned to suggest: a Fogstar 100Ah lithium, a Victron Orion B2B, a basic MPPT, and a Victron SmartShunt gives you 90% of a full Victron system for roughly half the cost. There's no law saying every component has to wear the same badge.
Wiring, safety, and what the regulations actually mean
This section is the serious one. No jokes here.
Cable sizing and fusing. Fuse every circuit as close to the battery as possible — at the source, not the appliance end. The fuse protects the cable, not the device. An undersized cable carrying 20A heats up, and the fuse at the battery is what stops that heat travelling all the way to a fire buried in your panelling. Use properly rated marine/automotive tinned copper cable, never cheap automotive wire. Cable size depends on both current and run length — a 5m run at 20A needs noticeably heavier cable than a 1m run. Use a calculator (12 Volt Planet's is good). Do not guess.
Earthing. The single most common fault in van builds is a poor earth. Every negative return should run back to a single earth bar or bus bar, never daisy-chained device to device. The chassis is not a reliable leisure earth. A dedicated negative bus bar costs about a tenner and saves you a world of intermittent, maddening faults.
BS7671 and your insurance. BS7671 is the UK wiring standard, and it applies to fixed electrical installations — which includes your van's leisure circuit. Your insurer may ask for evidence of compliance if you ever make a claim involving the electrics. In practice, "compliant" means your wiring has been inspected and certified by a qualified electrician and issued as an Electrical Installation Certificate (EIC) or Minor Works Certificate — typically £150–£400 for a van depending on complexity.
What you can sensibly DIY: the 12V side — cable runs, fusing, connections, battery installation — is well within a competent DIYer's reach and isn't usually what insurers scrutinise. The 240V hook-up circuit is where compliance genuinely matters. If you're fitting a shore power inlet and internal mains sockets, get that part signed off by a professional. It's the cheapest peace of mind in the whole build.
CO alarm if you have a diesel heater. Non-negotiable. Fit one near the sleeping area. [See the van heating guide for detail.]
Honest total cost by use case
Real numbers, because this is the biggest gap in everything else online.
Weekend warrior (80–100Ah usable, solar + hook-up, no inverter):
- 100Ah lithium battery: ~£280
- Victron SmartSolar MPPT 75/15 + 100W panel: ~£180
- Victron Orion-Tr Smart 12/12-18A B2B: ~£155
- Victron SmartShunt 500A: ~£55
- Fuse box, cable, connectors, earth bar: ~£100
- Total: ~£770 — and this is a genuinely capable system, not a compromise.
Seasonal user (150–200Ah usable, solar + alternator + hook-up, small inverter):
- 2× 100Ah lithium: ~£560
- Victron SmartSolar MPPT 100/20 + 200W panels: ~£280
- Victron Orion-Tr Smart 12/12-30A: ~£210
- Victron Blue Smart IP22 mains charger 25A: ~£130
- 1,000W pure sine inverter: ~£120
- Wiring, fusing, earth bar, monitor: ~£200
- Total: ~£1,500 — solid for 2–3 week trips.
Full-timer (300Ah+ usable, full Victron, year-round):
- 3× 100Ah lithium with low-temp BMS: ~£900
- Victron MultiPlus-II 12/3000 (inverter/charger combined): ~£650
- Victron SmartSolar MPPT 150/35 + 400W panels: ~£500
- Victron Orion-Tr Smart 12/12-30A: ~£210
- Victron Cerbo GX + GX Touch 50: ~£380
- Wiring, fusing, earth bar, cable management: ~£300
- EHU inlet + 240V sockets (professionally fitted): ~£250
- Total: ~£3,200 — before installation labour if you're not doing it yourself.
Installation by a specialist adds £400–£1,200 depending on complexity and where you are in the country.
The decision
Go AGM if you're doing occasional weekends, you're on a tight build budget, and you're mostly on campsites with hook-up. Replace when capacity visibly drops — typically every 3–4 years with moderate use.
Go lithium if you use the van more than a few times a month, you care about weight, or you want more than a day or two off-grid. Budget for a unit with a built-in low-temp BMS if you'll use it through UK winters.
Keep it simple if you're a weekend warrior. A 100Ah lithium, a 100W panel on a basic MPPT, and a B2B charger will serve you brilliantly. You don't need a Cerbo GX. You don't need a MultiPlus. You need those three things to work reliably, and they will.
Go Victron throughout if you're full-timing, you've several charge sources to monitor together, or you're the sort who wants to open an app and know exactly what every component is doing at 7am from inside a sleeping bag. At that level of use, the integration genuinely earns its cost.
And accept hook-up in winter. This is the most UK-specific advice in the whole guide. If you're planning year-round use, design around hook-up for October to March. Build enough solar for summer off-grid freedom — and don't beat yourself up for plugging in on a campsite when the sun's gone down at four o'clock in January. That's not failure. That's just living in Britain.
Photos: PNW Production